This post may contain affiliate links, read my disclosure policy for more information. Advertisements displayed do not reflect endorsements or recommendations made by Entirely Elizabeth.
Learn how to hang dry herbs the old fashioned way, and with no fancy equipment needed! This simple method gives you intensely flavorful dried herbs that stay fresh for up to 2 years.
Whether you’re drying basil, lavender, thyme, or any other herb from your garden, hang drying works beautifully for them all.
If you’re looking for another way to preserve your fresh herbs, try my homemade Herb Salt.

If you don’t have a dehydrator, freeze dryer, or you don’t want to sit around all afternoon waiting on herbs to oven dry, this guide is for you! Hang drying herbs is the old fashioned method used for preserving herbs, and there are so many benefits.
- The flavor is more intense than store-bought dried herbs.
- They retain more health benefits because of how they are dried slow and at a cool temperature.
- They’re shelf stable for up to 2 years.
- You can make homemade spice blends and teas with them.
- It’s a way to use your fresh herbs before they go bad or the plants bolt and die in your garden.
Plus, there’s something deeply satisfying about seeing beautiful herb bundles hanging in your house, filling your home with their wonderful aroma. It’s a simple and timeless method that connects us to our ancestors.
Watch This Video Tutorial
What Herbs Are The Best For Hang Drying?
There are no limits to hang drying herbs. You can use rosemary, thyme, mint, cilantro, basil, oregano, lavender, thyme, parsley, chives, sage, tarragon, chamomile, and bay leaves. You can even hang dry the flowers of cilantro (coriander) and dill to harvest the seeds and plant them in your garden next year.
What You’ll Need
Here’s everything you will need to hang dry herbs at home, plus a couple important notes.
- Herbs: I mostly use herbs harvested from the garden, but have also preserved store-bought herbs.
- Scissors: Sharp kitchen shears are a must when harvesting your herbs. The clean cut will help your plant heal quickly and continue to grow.
- Twine: Use a Cotton butcher’s twine that is marked food safe. You can also use jute or hemp twine and small rubber bands.
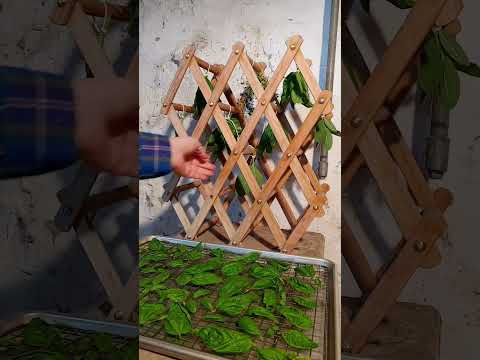
- Drying Racks: If you need something small, I recommend using a collapsible wood wine bottle holder (like I used). You can also use a large collapsible wood laundry rack.
- Storage Containers: Whatever you choose, make sure it is glass and has an airtight lid. I recommend small jars or these hinged lid containers.
- Food Processor: I use a small, 3.5 cup food processor to easily break down the dried herbs. You can use a coffee grinder, mortar and pestle, kitchen scissors, or crush the dried herbs by hand.
- OPTIONAL Jar Vacuum Sealer: This handheld sealer is great for quickly sealing your jars of herbs, it sucks out all the air to keep them fresher even longer. And if you open the jar of herbs, you can reseal them over and over again.

How to Hang Dry Herbs
1. Harvest your herbs. The best time to do this is in the morning and with a sharp pair of kitchen scissors. Always cut just above a leaf node (where leaves meet the stem), or 1 inch from the ground (for non leaf node herbs), and never remove more than 1/3 of the plant at a time.
2. Prepare the herbs for drying. Start by removing any leaves that are damaged, yellow, and brown or dead. Then shake them gently outside to remove little bugs or dirt. I personally do not wash my herbs, but I also do not spray mine with chemicals and they are tucked behind my house away from critters. If you want to wash them, do it with cool water and make sure they are completely dry before moving on.
3. Bundle the herbs together. Gather small bundles of leaves or larger bundles of stemmed herbs and tie them off with kitchen twine, leaving long tails. Tie the tails around a spindle of the drying rack, keep enough space between the bundles for proper airflow.
4. Dry the herbs. Place your rack of herb bundles in a cool, dry, and dark place like a cellar, garage, or cabinet. Dry times vary based on how much moisture is in the herbs you are drying, but generally it’s one to two weeks. When dried they should be aromatic and green, but crispy and crumbly to the touch.


Storing Your Dried Herbs
Your herbs will be ready for storing when there’s no moisture is left in the leaves or stem. The stems are the last thing to dry down, so if they’re still pliable they’re not ready.
You’ll want to remove the leaves from the stems and only save the leaves. I put mine in a food processor or coffee grinder to break them down into the perfect size, but you can also do it by hand, with kitchen scissors, or a mortar and pestle. Also, instead of discard the stems throw them back in your garden beds to naturally compost.
Place the dried herbs in airtight jars or other glass containers, then store in a cool, dark cabinet or pantry. They’ll keep up to 2 years and for expanded storage use a handheld jar sealer.

Tips & Helpful Information
When harvesting, only cut 1/3 of the plant at a time. Cutting more than 1/3 can shock the plant and cause it to quit growing and even die.
Keep herbs separate in all stages. There is nothing worse than having to separate herbs because they got mixed together. I recommend working in batches and by herb type to keep organized. But feel free to mix dried herbs at the end to make your own spice blends.
Dry extra or lone herbs and flowers on cooling racks or screens. They are fully exposed to the air this way and promotes even drying.
Keep your herbs in the dark. Sunlight causes the herbs to lose their beautiful green color. Keep them out of direct sunlight to prevent this from happening.

Recipes With Multiple Herbs You Might Like
There is nothing we love more than an herb packed recipe. Here are a few that use more than one herb and are a great way to use your fresh and dried herbs.
- Herb Roasted Chicken and this Homemade Chicken Stock (from the carcass)
- Lemon Orzo Salad with dill, parsley, and mint
- Chimichurri Aioli with parsley and oregano
- Cottage Cheese Ranch Dip with dill and parsley, plus it goes great with garden fresh veggies.
- Herb Roasted Mushrooms with rosemary and thyme
- Greek Lemon Feta Fries with oregano and parsley
- Or browse all recipes, we love using herbs to elevate flavors here!


How to Hang Dry Herbs
EQUIPMENT
- kitchen scissors - sharp
- twine - cotton
- drying racks - small collapsible and large collapsible
- food processor - small, or crush by hand, with a mortar and pestle, or kitchen scissors
- glass jar - 4 ounces or small hinged lid spice jar
- jar vacuum sealer - handheld
MATERIALS
- fresh herbs - from garden or store-bought
INSTRUCTIONS
- Harvest herbs in the morning and with sharp kitchen scissors. Cut herbs just above a leaf node (where leaves meet the stem) or 1 inch from the ground (for herbs that do not have leaf nodes). Remove no more than 1/3 of the plant at a time. Keep each herb seperate to make tieing in bundles easier.
- Prepare herbs by removing any damaged, yellow, brown, or dead leaves. Gently shake the herbs to remove bugs, debris, and dirt. OPTIONAL: Wash the herbs with cool water and shake them to remove excess water. Place washed herbs in a single layer and on a tea towel to dry completely before moving on.
- For small leaf bundles, cut an 8 inch piece of twine. Gather 6-10 leaves and bundle, tie them with twine and leave long tails. Continue until all herbs are tied in bundles.For large stemmed herb bundles, cut a 10 inch piece of twine. Gather 10-15 stems, tie them with twine and leave long tails. Continue until all herbs are tied in bundles.NOTE: Dry lone herbs and flowers on a cooling rack or an old window screen.
- To a collapsible wood rack, tie the tails around a spindle of the rack. Allow each bundle to hang upside down and keep enough space between them so they have proper airflow.
- Place the rack of herbs in a cool, dry, and dark place like the basement cellar, garage, or a kitchen cabinet. Allow the herbs to dry for 1 to 2 weeks or until aromatic, green, and crumbly to the touch. NOTE: Stemmed herb bundles will take longer than small leaf bundles because stems are the last thing to dry down. If they are still pliable and do not snap, they are not ready.
- Working in batches by herb type, cut twine and remove leaves from the stem. Place leaves in a food processor and pulse until desired size is reached. Store dried herbs in an airtight jar or hinge lid spice jar. They are best kept in a cool, dark cabinet or pantry for up to 2 years.OPTIONAL: For prolonged storage, use a handheld jar vacuum sealer to seal jars of herbs.
VIDEO
Metric conversions are calculated automatically. I cannot guarantee the accuracy of this information.

