This post may contain affiliate links, read my disclosure policy for more information. Advertisements displayed do not reflect endorsements or recommendations made by Entirely Elizabeth.
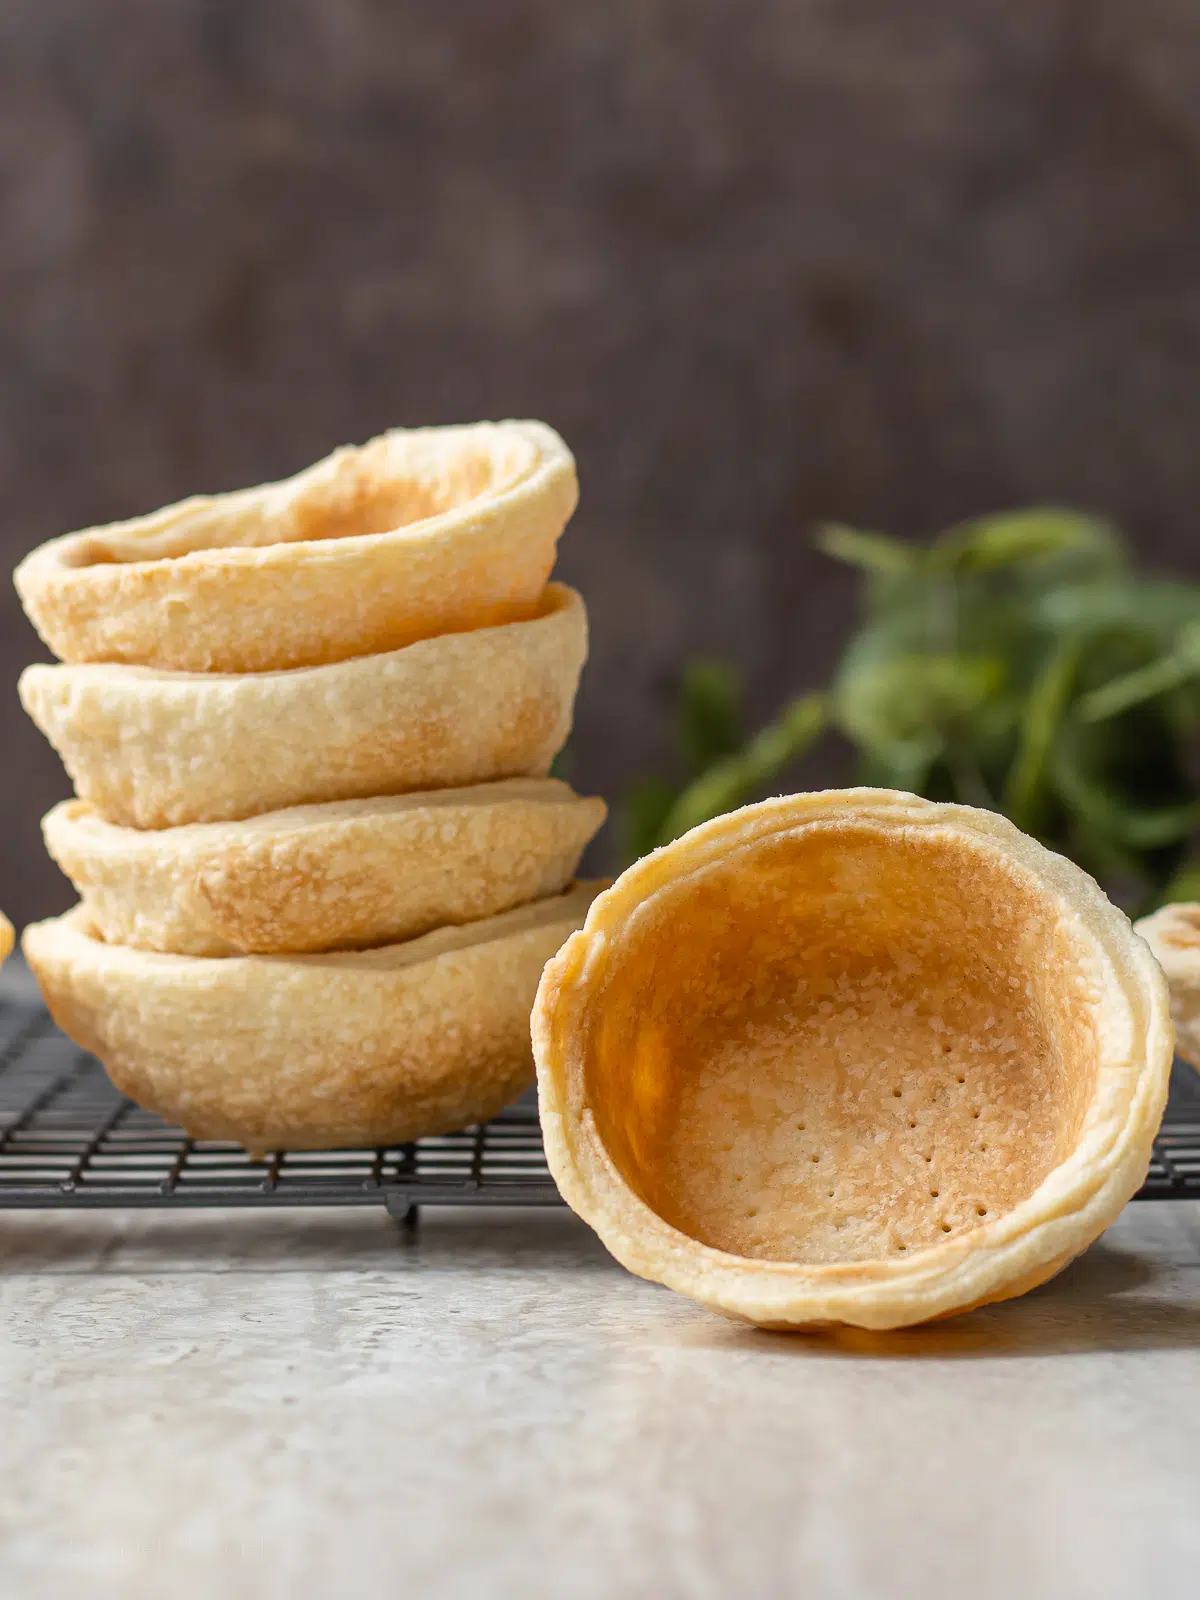
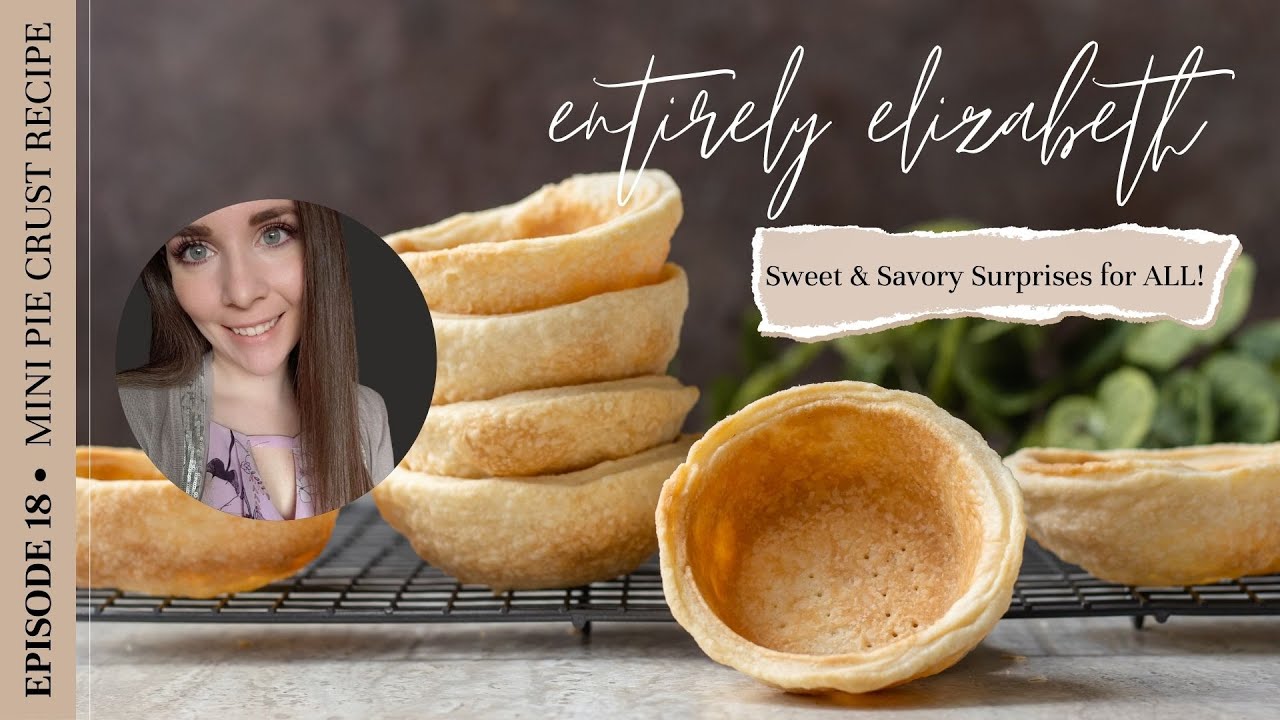
This is the best and easiest way to blind bake Mini Pie Crust Shells. It doesn’t matter if you use homemade or store-bought pie dough, let gravity and a cupcake baking pan do all the work. Guaranteed delicious and flaky every single time.
Use this recipe for your favorite no bake or pre-cooked pie fillings.
To learn more about pie crust, check out my Vodka Butter Pie Crust. It has everything from fool proof tips to detailed instructions so you can make perfect pie crust.
This recipe has a super fun story that I think everyone can relate to. I was attempting to make some mini chocolate cream pies because I was craving them so bad! I kid you not, I ruined at least thirty mini pie crusts trying to bake them in a cupcake pan (keyword here is in).
You know what I am talking about, we see it everywhere as the “go-to” method. But anyways, I tried chilled dough, non chilled dough, store-bought dough, my personal recipe, lining them with pie weights and rice, different temperatures, etc. Nothing worked! They kept shrinking into little tough hockey pucks.
Needless to say, I was fuming. I ended up surrendering on the couch with my bowl of chocolate filling and failed pie crust. I ate it by the spoonful until it hit me, it wasn’t the recipe giving me issues it was the method!
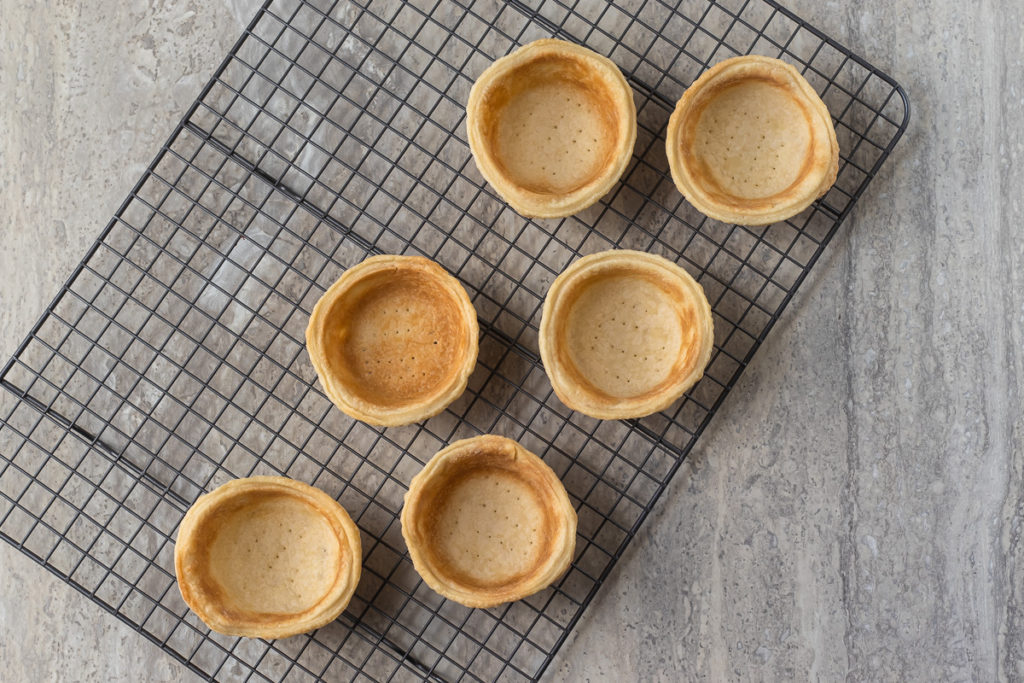
That’s when I jumped back in the kitchen and tried something that has never been done before, until now! I baked the mini pie crusts on the bottom side of the cupcake pan instead. It works great for two reasons:
- their shape stays more intact because of gravity
- the outside of the crusts are exposed directly to the heat so they brown exactly where they should
Let’s Make Them Together! Video Tutorial:
Equipment and Ingredients for Mini Pie Crust Shells
Here’s everything you will need to make this recipe. Keep reading for important notes and swaps on each!
- PIE DOUGH: I always use my homemade Vodka Butter Pie Crust, but you can also use store-bought crust. Just make sure it is chilled (emphasis on the chilled, pie crust bakes best when it is cold). You can also use this method on the new Pillsbury Mini Pie Crusts.
- FLOUR: For dusting your work surface and prevent sticking. I use all purpose but any type of flour is okay.
- LARGE ROUND COOKIE CUTTER: I like this set of 3 because I can make many different sizes. You can also use a wide mouth jar, glass, or something large and round that can be used as a cutter.
- STANDARD SIZE CUPCAKE BAKING PAN: Make sure you use a light colored cupcake pan and it is clean. You don’t want food and oven bits in your crusts. I used some vinegar to wipe mine down but if yours is dirtier I recommend washing in warm, soapy water.
- COOLING RACK: All wire racks are the best for cooling the pie crust shells.
- ROLLING PIN: You won’t need one if you are using store-bought pie dough. I always recommend using a marble rolling pin because the weight is perfect and they stay cold as you roll.

How to Make Mini Pie Crust Shells
Here’s a quick overview of the steps so you can get familiar. The recipe card below will have complete details and instructions.
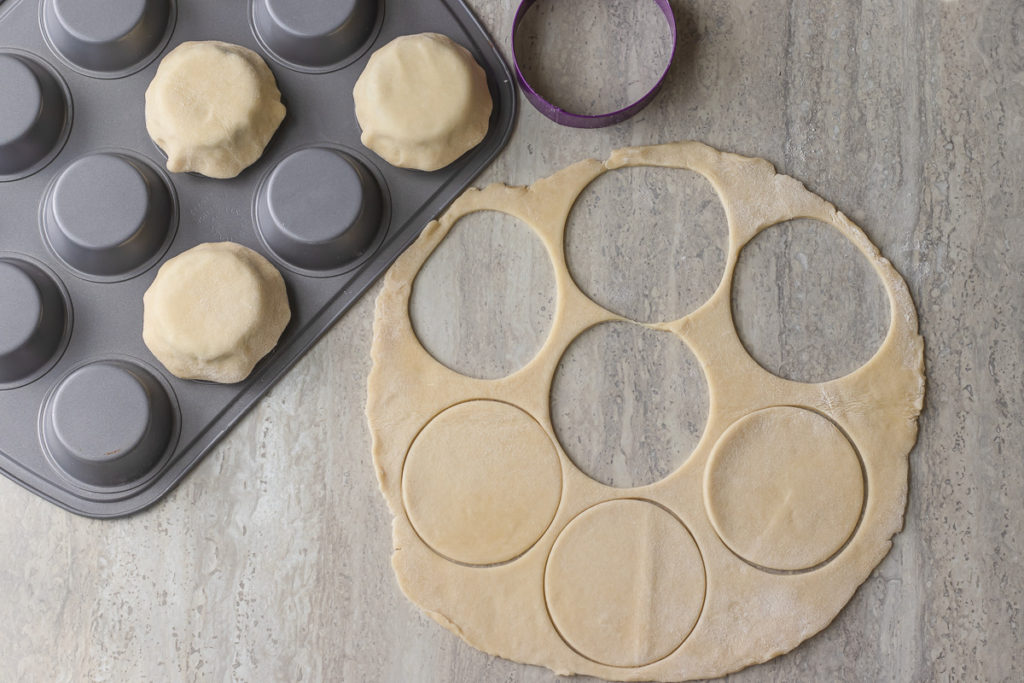
1. ROLL OUT PIE DOUGH: Lightly flour your surface and roll the cold pie crust to about an 1/8 inch thick. If it is too thin you will have trouble stretching and forming it around the cupcake cavities so keep this in mind.
2. CUT OUT CIRCLES: Flour your large cutter and cut out 12 crusts. If the cutter begins to stick, you may need to flour it again.
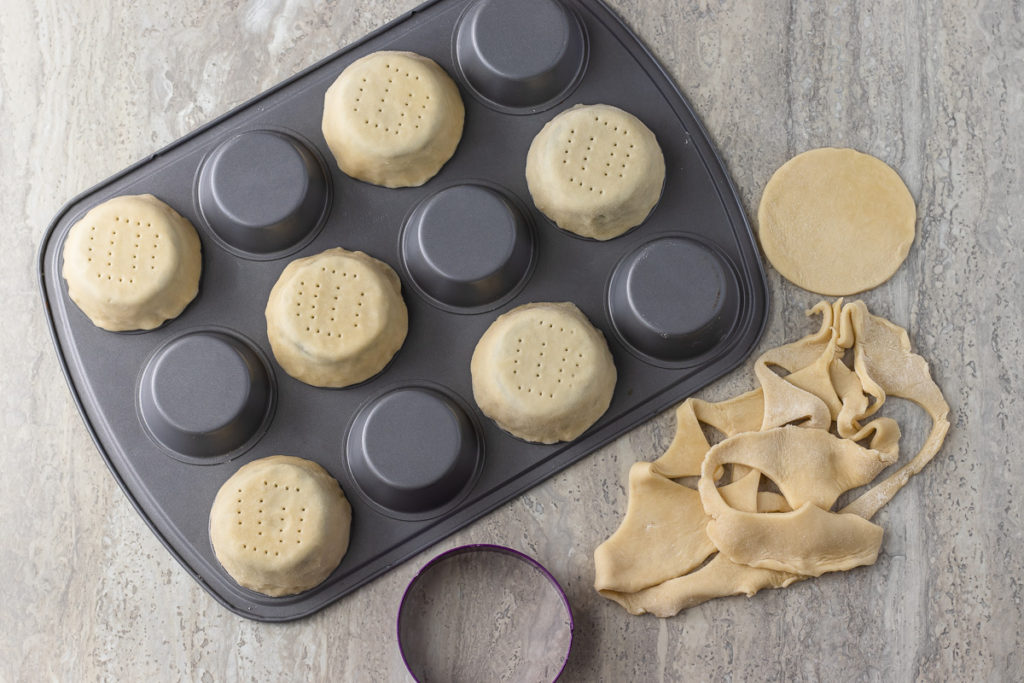
3. FORM DOUGH AROUND THE CUPCAKE CAVITIES: Lightly press and stretch the dough from the top first. This allows air to be released and the dough to stretch a bit making it easier to form around the sides. When you form the crust around the sides make sure it reaches to the bottom of the pan. Pierce your dough with a fork.
4. FREEZE: Place them in the freezer for 5 minutes to firm up. If you don’t have room in your freezer you can also place them in the refrigerator for around 10 minutes. This is key to keep them from shrinking!
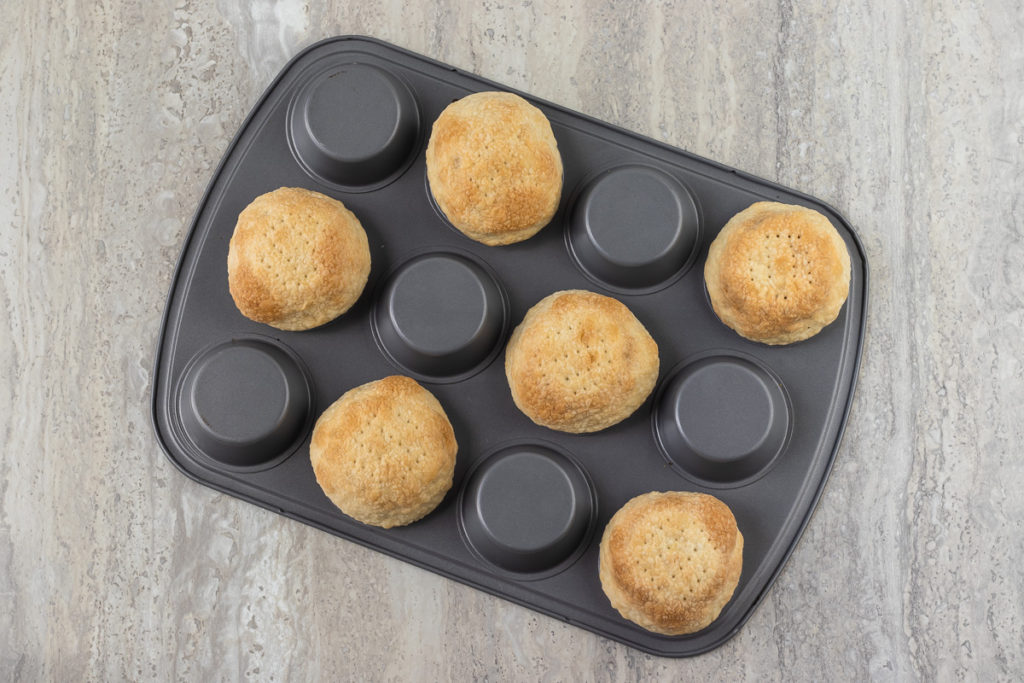
5. BAKE: 10 to 12 minutes or until golden brown.
6. COOL: Allow them to cool on the cupcake pan for another 10 minutes to prevent breaking as you move them. Place on a wire rack to continue to cool to room temperature.
There will be variation with the shape of your pie crusts. If they are not perfect, that is okay! Neither are we. They are perfectly imperfect like us but I guarantee they will be flaky and tasty!
Ways to Use Your Mini Pie Crust Shells
This recipe is great for sweet or savory mini pies. Just make sure you are using cooked or no bake fillings for this recipe, they get burnt when twice baked. Fill them with…
- puddings or custard like key lime, French silk, coconut cream, chocolate black bottom pie, pumpkin, or pastry cream
- fresh fruit or cooked pie filling like apple, triple berry, cherry, rhubarb, strawberry, mango, peach, or passionfruit
- curd, fruit jams, or compotes like this Cranberry Cherry Compote
- cooked savory fillings like chicken pot pie
- unconventional things like no bake cheesecake, edible cookie dough, Nutella, or Biscoff cookie butter.
As you can see, there are tons of options. I have to say, my Mini Lemon Meringue Pies are my favorite but make them how you want!
Storing Information
You can store empty pie crust shells in an airtight container and at room temperature for up to 7 days. I do not recommend refrigerating them because they tend to draw moisture and become soggy. Some does for freezing, do not freeze them.
If you already filled your pie crust shells, you will still want to store them in an airtight container. If they have a filling that contains dairy you will want to store them in the refrigerator for up to 4 days. And if the filling does not contain dairy, they can be kept at room temperature for up to 2 days or in the refrigerator for up to 4 days.

3 Baking Tips You Need To Read
Although this recipe is easy, there is an art to pie crust. Here are 3 things to help set you up for success.
- If you are unable to get twelve crusts you can form the dough into a ball, place in the refrigerator for ten minutes, and re-roll out. Again, chilled dough is what we want throughout this process. Or you can make Pie Crust Cookies (Pie Crust Chips).
- Make sure your crusts are snug against the pan or it gives heat a chance to get where you don’t want it. This can cause bubbles and shrinkage.
- Do not put the crusts in the oven without chilling them. Heat with a room temperature crusts causes the butter to melt quickly and the pie crusts will shrink and even fall apart. And if by some miracle they remain intact, they will be very tough.
Frequently Asked Questions (FAQ’s)
Yes, you can use a standard cupcake pan, a mini pan, or even a jumbo pan. The bake times will slightly differ though so keep a close eye on them as they bake.
I do not recommend doing this because it will burn and even dry out the crusts. This recipe and method is made for filling that is already cooked or does not require any additional baking.
This can be for many reasons. Your dough was not cold enough, they were not pressed firmly against the cupcake pan, you forgot to pierce the dough with your fork to allow steam to release, your dough has too much water in it (which is why I recommend my Vodka Butter Pie Crust).
Other Pie Recipes To Try
Thanks for dropping in! Be sure to SUBSCRIBE to my weekly newsletter for fun NEW CONTENT and CONVERSATION delivered to your inbox. If you love this recipe save it now so you can find it later. Thank you for your support!


Mini Pie Crust Recipe
EQUIPMENT
- Rolling Pin - marble
- Cupcake Baking Pan - standard, 12 count
- Large Round Cookie Cutter - 3 ¾ inches across, I love this set of 3
- wire cooling rack - metal
INGREDIENTS
- 2 pie crusts; - homemade or store bought (9 inches)
- 2 tablespoons all-purpose flour; - for work surface and rolling out dough
INSTRUCTIONS
- Preheat your oven to 400 °F. Roll out the pie crust so it is thin but not too thin. You want to be able to stretch it over the cupcake cavities on your baking pan.
- Lightly flour your round cutter and cut out twelve circles.* If you are unable to get twelve crusts you can form the dough into a ball, place in the refrigerator for ten minutes, and re-roll out.
- Flip your cupcake baking tin so it is facing down. Form your pie crusts over each of the cavities of the baking tin. Make sure they are stretched all the way to the bottom of the tin and slightly press down.
- Pierce the crusts with a fork and put them in the freezer for five minutes. Do not skip this step as it keeps the crusts from shrinking too much.
- Place your crusts in the oven for ten to twelve minutes or until golden brown.
- Allow to cool for ten minutes and then place on a wire rack to cool to room temperature.
VIDEO
RECIPE NOTES
Storing Information:
- Empty Pie Crust Shells: Room temperature, in an airtight container, for 7 days.
- Filled Pie Crusts with Dairy Based Filling: Refrigerated, in an airtight container, for up to 4 days.
- Filled Pie Crusts without Dairy Based Fillings: Room temperature, in an airtight container, for up to 2 days. Refrigerated, in an airtight container, for up to 4 days.
- Freezing is not recommended.
Metric conversions are calculated automatically. I cannot guarantee the accuracy of this information.


my midnight mini pie making adventure was a success. this method worked perfectly. 10/10 would recommend.
It’s a great method! My 89 year old mom and I used it to make tarts during her last Christmas. She was hesitant at first, but convinced shortly when it was so much easier to form the dough over the outside of the muffin tin.
Could you use a sweet sugar crust on the back of the tins or will they shrink too much? Thank you
Hi Denise,
I have never tried it before. The crust may be too light and fall away, or it may turn out great. If you do try it would you come back and let us know. Thanks!
~Elizabeth
How big is the cookie cutter? I might have missed it, but all I can find is “large” cookie cutter. Is it about 3 inches across?
Thanks
Hi Claire,
Sorry about that! My cookie cutter is 3 3/4 inches across.
~Elizabeth
BRILLIANT! Totally out of the “box” (wink wink) thinking.
This is genius! I tried it and they came out great. Quick question for you though – do you have any suggestions for reheating them if I want to put an apple filling in them? Or should I heat the apple filling first then fill them after? Thanks!
Hey Sarah;
Great question! You could do either: if your mini apple pies are already filled they could be warmed up in the microwave or toaster oven. Or like you said, heat up the filling and fill the crusts at room temperature (the warm filling will warm up the crusts on its own. Hope this helps!
~Elizabeth
This is genius! I’ve never been able to get a decent mini pie crust ever, and always tried baking them inside the cupcake pan too but they always collapsed in on themselves. I never would have thought of doing this! It has worked out perfectly, thank you!
I also love that they are a little bit bigger when you make them in this way, which makes room for more filling. I usually buy premade pie fillings at this time of year which saves me time, but I can make my pies look gorgeously homemade with these rustic little cases.
Big thumbs up!
I’d like to try these for mini chicken pot pies. I see that they shouldn’t be baked twice. Any recommendations about how to prepare?
Hi Jim!
The only way this could be successful is by preparing the pie crusts as normal and fully cooking the chicken pot pie filling on the stove. When ready, spoon the warm filling into the pie crusts and serve. I have a pie crust cookies (pie crust chips) recipe (https://entirelyelizabeth.com/pie-crust-cookies) that you could prepare to make a top crust layer from. I hope this helps!
~Elizabeth
My god this is actually a genius idea. I HATE fitting pie dough into the cupcake tin – gonna use these for mini key lime pies this weekend! Thanks so much, Liz!
These pie crusts come out perfect and they don’t stick in the tin, major win! I’ll make them so much more often now.
I used your pie crust recipe to make these little tart shells! The step-by-step instructions were soooo easy to follow. Thank you!
I made these on Easter and filled them with different flavors of pudding. The kids and adults loved them.
I had never in my life considered making mini pie crust shells until I saw this recipe but it looked so easy I had to try – and it was, truly, super easy! I love these little shells! I filled mine with banana cream pie filling but have plans to make all kinds of little mini pies with these shells. Thanks so much!
Love this idea. I make mini pies for the holidays using cupcake pans and always end up frustrated because they shrink. Gonna definitely make them this way now. Thank you.
Is this a par bake? Can I place them back in the oven later with my pie filling? Or, will they burn if they go back in?
Hey Jill:
This is not parbake. I do think if you put them back in they will burn. But if you wrap them in tin foil they shouldn’t but the filling will still cook.
~Elizabeth
I tried this method to make my tart crusts. It was a success because the dough doesn’t shrink! The gravity worked in my benefit. My toddler was able to help, so fun when the little once can participate. Will be trying out more of your recipes ☺️
Eva:
I am so happy to hear that it worked out so well for you! And thank you for sharing a photo with me on Instagram!
~Elizabeth
perfect! Just a bit more room for my caramel! Thanks a bunch!
I never tought of putting the dough on the back of a cupcake baking pan. This is such an awesome idea and worked perfectly. Gonna be making mini pies like that alot in the future!
Thank you! I am so glad this worked out for you! YAY!
~Elizabeth