This post may contain affiliate links, read my disclosure policy for more information. Advertisements displayed do not reflect endorsements or recommendations made by Entirely Elizabeth.
This soft and fluffy Homemade Sandwich Bread is simple to make and perfectly sliceable. It’s a great recipe for making PB & J sandwiches, French toast, homemade croutons, and beyond.
Plus you’ll learn all of my secrets to blooming yeast, rising bread in cold climates, how to shape the perfect loaf, and extra tips for success.
Since you’re making this recipe, I bet you need a 1 minute Avocado Oil Mayonnaise recipe too!

Believe it or not but my first baking experience was not chocolate chip cookies, it was sandwich bread! I have spent so much time learning about the science behind the bread making process and experimenting to create my own recipe.
Honestly, there is nothing more satisfying than making your own bread at home. It tastes a million times better than store-bought, you don’t have to worry about preservatives, artificial ingredients, seed oils, and the smell is amazing.
My homemade sandwich bread recipe is simple to make, but does take some time. And don’t worry if you’ve never made bread before I will walk you through every step, share all my secrets, and I can guarantee you’ll be making sandwich bread weekly just like me.
For another homemade bread recipe try my old fashioned dinner rolls. They take only one hour to make and are so delicious! I also have this Cornbread Mix with recipes for skillet cornbread and honey cornbread muffins.

Ingredients for Homemade Sandwich Bread
Here’s everything you will need to make this recipe and a few important notes.
- Water
- Whole Milk: This makes our homemade sandwich bread soft because of the fat content in it. I don’t recommend using any other type of milk or your bread will be crumbly in texture.
- Granulated Sugar: This is essential for the yeast to bloom, so don’t leave it out or reduce it.
- Yeast: In this recipe we use active dry yeast, but I also include instructions for using instant dry yeast if that’s all you have. I do strongly recommend active dry yeast and you can read why in the next section.
- Unsalted Butter: Make sure it’s unsalted or your bread will be too salty.
- Bread Flour: I recommend using unbleached bread flour from King Arthur. You can also use all-purpose flour, but it will affect the texture of your bread. Bread flour makes for a soft and fluffy bread whereas all-purpose tends to be a little more dense and doesn’t rise as much either.
- Salt

Instant Dry Yeast versus Active Dry Yeast
A question I get over and over is “can I use instant dry yeast instead of active dry yeast?”. Most people lean towards instant dry yeast to avoid having to bloom or activate it. But did you know that active dry yeast is the better choice in sandwich bread because it has a slightly slower fermentation process that leads to better textured and tasting bread?
When active dry yeast is mixed with warm liquid (water and whole milk in this case) and sugar, the yeast activates and eats the sugar which causes fermentation. In fermentation CO2 bubbles get trapped within the dough’s gluten and causes it to rise. Another bonus is if your yeast doesn’t bloom (because you killed it or it was expired) you will know before you ever mix your bread dough. This saves you time, ingredients, and essentially money.
Bloom Yeast Like A Pro
Like I said above yeast needs warm liquid and sugar to activate or bloom. The key here is to warm the water and whole milk somewhere between 100-110 degrees Fahrenheit. Any cooler the yeast will not be active and any warmer will kill the yeast. Both will give you a bread that doesn’t rise.
All you have to do is heat the water, whole milk, and granulated sugar to 100 to 110 degrees Fahrenheit. I recommend doing this in a saucepan on the stove to prevent burning or over-heating. Pour the warmed water and milk mixture into a large measuring cup (check the temperature for accuracy) and then stir in the yeast. Allow it to bloom for 10 minutes.
A properly bloomed yeast will produce a thick top layer of foam and a yeasty smell. If your yeast did not do this you’ll want to discard the mixture and try again. This can be from an over-warmed water and milk mixture or because your yeast is expired.

How to Make Homemade Sandwich Bread
1. Mixing the Dough & First Rise: To your stand mixer add bread flour and salt, slowly pour in the bloomed yeast mixture (go back a section to learn about blooming yeast) and then the melted unsalted butter. Knead on low speed for 5 to 7 minutes, place the dough in an oiled bowl to rise and double in size.


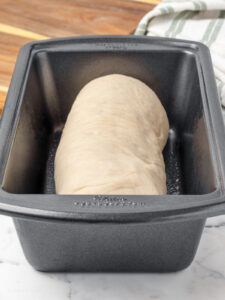
2. Shaping the Dough & Second Rise: Punch down the dough and knead by hand for 1 to 2 minutes. Allow it to rest and relax for 5 minutes before rolling into a 9 inch log (more information about shaping your loaf below). Place the loaf into a lightly greased bread pan and allow it to rise until double in size.


3. Baking the Homemade Sandwich Bread: Bake for 25 to 30 minutes. Once the bread has baked, immediately brush it with unsalted butter. After 15 minutes, gently remove it from the bread pan and allow it to cool completely before slicing.

How to Shape Sandwich Bread
When I was learning how to make bread one thing I searched and searched for was detailed instructions on how to shape a loaf. It was always breezed over as if it was common sense, but really there is an art to it.
You’ll start off by patting the dough into a rectangle that is the width of your loaf pan. Be sure to use your fingers and don’t be afraid to press out any of those air bubbles (they create annoying air pockets when you cut your baked bread). Next, start rolling the dough from the short edge and slightly tug it dough towards you and press down with each roll you make.
Once it’s rolled up you’ll want to pinch together the bottom seams, tuck the ends under and pinch them to the underside of the loaf. This keeps everything in place and from unrolling. Also, make sure all the seams are on the bottom of the loaf and you place it seam side down into the bread pan.

Rising Bread In a Cold Climate
If your home is cold you can still have fluffy sandwich bread that has both height and texture. We know yeast needs perfect conditions to thrive and we can recreate those conditions in our oven.
Just set your oven to the lowest temperature (around 170 degrees Fahrenheit) and once it warms up, turn off the oven. Put the dough or loaf in there until doubled in size. It takes about 30 to 45 minutes maximum. P.S. This is also a great method for rising homemade sandwich bread in a quarter of the time.

3 Must Read Recipe Tips
1. Properly measure your bread flour using the spoon and level method. Just whisk your flour to aerate it then use a spoon to scoop it into your measuring cup. Once full level it off using a knife. It gets the perfect amount every time.
2. If you don’t have a stand mixer, knead your dough by hand. You can easily knead the dough by hand, it’ll just take twice the amount of time as written in the recipe card.
3. Don’t worry if it’s not perfect, homemade sandwich bread is meant to be rustic. I’ve been baking bread since 2009 and I still have days where I bake imperfect loaves. Sometimes the center will sink a little, one too many air pockets, another will overrise because I lost track of time, or it’s too cold and my loaf didn’t rise as much. Despite these things the loaves have always been delicious and so will yours!

Storing & Freezing Information
To keep as much air out as possible, I like to wrap my homemade sandwich bread in aluminum foil and then place it in an airtight container. Sometimes I use a glass container and sometimes it’s a sealable plastic bag. Either way, we want to keep as much air out as possible to keep it from going stale.
You can keep your loaf at room temperature for 4 days, refrigerated for about 7 days, and in the freezer for up to 3 months. If you are freezing it, I recommend slicing the bread and then placing small squares of parchment paper between each slice. This keeps them from sticking together and you can grab a few slices at a time without getting the whole loaf out.

More Semi Homesteader Recipes To Try


Homemade Sandwich Bread
EQUIPMENT
- stand mixer - fitted with dough hook attachment
- bread pan - 9×5, metal
INGREDIENTS
- ½ cup water
- ½ cup whole milk
- 3 tablespoons granulated sugar - or honey
- 1 tablespoon active dry yeast
- 2 tablespoons unsalted butter - melted, or avocado oil
- 2½ – 3 cups bread flour - measured using the spoon and level method
- ¾ teaspoon salt
INSTRUCTIONS
- To the stand mixer bowl add 2½ cups of the bread flour and salt. Whisk together and set aside.
- In a saucepan heat the water, whole milk, and granulated sugar until it is between 100 °F and 110 °F. Pour the warmed water and milk mixture into a large measuring cup and check the temperature for accuracy before moving on.
- Add the active dry yeast and lightly whisk the two together. Allow it to bloom for 10 minutes.ELIZABETH'S NOTE: A properly bloomed yeast will smell yeasty and produce a foamy layer. If it doesn't the yeast was either expired or the milk and water mixture was too warm which killed the yeast. Discard the mixture and start over.

- Fit stand mixer with dough hook and turn on low speed (#1 or #2). Slowly pour the bloomed yeast and melted butter into the flour mixture. Allow it to knead into a smooth dough for 7 minutes. ELIZABETH'S NOTE: If after 5 minutes the dough continues to stick to the bottom of the bowl, add one tablespoon of bread flour at a time until it becomes smooth and doesn't stick to the bottom.
- Place the kneaded bread dough into a large oiled bowl and set it somewhere warm to rise and double in size. This can take anywhere between 45 minutes and 1 ½ hours.ELIZABETH'S NOTE: For cold climates set oven to lowest temperature (around 170 °F). Once it has come to temperature, turn it off and put the dough in the oven to rise until doubled in size (30 to 45 minutes).

- Once the bread dough has doubled in size, punch it down to deflate it. Pour the dough onto a clean workspace and knead by hand for 1 to 2 minutes. Cover with a towel and allow it to rest for 5 minutes.

- Pat and press the bread dough into a rectangle. It should be the width of the loaf pan and there should be little to no air bubbles. Start rolling from the short edge and slightly tug it towards you and press down with each roll for a tight loaf. Pinch together the bottom seams and then tuck the ends under and pinch them to the underside of the loaf.
- Place the bread loaf into a lightly greased bread pan (seam side down) and allow it to rise until doubled in size. This can take anywhere between 30 minutes and 1 hour.ELIZABETH'S NOTE: For cold climates, set oven to lowest temperature (around 170 °F). Once it has come to temperature, turn it off and put the loaf in the oven to rise until doubled in size (30 minutes). Cover and place the risen loaf on top of the oven while it preheats.
- Preheat oven to 375 °F and center your oven rack. Bake loaf of bread for 25 to 30 minutes or until the crust is golden brown.

- Immediately remove the homemade sandwich bread from the bread pan and place it on a wire rack to cool. Once the loaf is completely cooled cut it into slices using a sharp bread knife.

RECIPE NOTES
STORING INFORMATION
- Wrap homemade sandwich bread in aluminum foil and place in an airtight container or sealable plastic bag. At room temperature it’s best to eat within 4 days and refrigerated for about 7 days.
- Freeze bread for up to 3 months. I recommend slicing the bread and then placing small squares of parchment paper between each slice. This keeps them from sticking together.
RECIPE TIPS
- Properly measure your bread flour using the spoon and level method. Just whisk your flour to aerate it then use a spoon to scoop it into your measuring cup. Once full level it off using a knife. It gets the perfect amount every time.
- No stand mixer? No problem! Easily knead the dough by hand, just add double the amount of time.
- Don’t worry if it’s not perfect, homemade sandwich bread is meant to be rustic. I’ve been baking bread since 2009 and I still have days where I bake imperfect loaves. Sometimes the center will sink a little, one too many air pockets, another will overrise because I lost track of time, or it’s too cold and my loaf didn’t rise as much. Despite these things the loaves have always been delicious and so will yours!
Metric conversions are calculated automatically. I cannot guarantee the accuracy of this information.

